Let’s Understand Stable Diffusion Inpainting
16 Aug 2023
In this article, we will explore the simplest approach to use Stable Diffusion for image inpainting. We all know, that the best way to grasp a concept is by implementing it. We will enhance the existing StableDiffusionImg2ImgPipeline from diffusers to solve inpainting tasks.
👨🏻🎨 It is better to use either StableDiffusionInpaintPipeline or StableDiffusionInpaintPipelineLegacy from the 🤗 Diffusers library for your real-world tasks. These options are more comprehensive. The first one is specifically designed to work with SD models that have been fine-tuned for inpainting tasks.
All the code, images and requirements can be found in my GitHub repository diffusers-inpainting.
How Stable Diffusion Works
Let’s begin with a brief theory lesson. Stable Diffusion is a diffusion model that generates images by operating on the latent representations of those images. The algorithm looks like this:
- Stable Diffusion retrieves the latents of the given image from a variational autoencoder (VAE).
- It uses CLIP to obtain embeddings of the given prompt.
- The diffusion process takes place using a UNet-like model, utilizing the latents from the first step and the prompt embeddings from the second step.
- Finally, the result of the diffusion process is decoded using the VAE.
If we want to focus only on text-to-image generation without the need for image-to-image, we can skip the first step and begin the diffusion process directly from noise. This scheme is oversimplified, but it accurately captures the main idea.
But what is the diffusion process? It is a process in which a UNet-like model receives latents and prompt embeddings as inputs. Then, it adds noise to the latents or starts directly from noise if it is not an image-to-image task. The amount of noise added is determined by a hyperparameter.
The UNet, given initial latents and prompt embeddings, predicts noise, which is then subtracted from the input. The resulting output is passed through the UNet again, making it an iterative algorithm. So at each diffusion step, model “cleans out” noise from the latents. After several dozen iterations, we obtain VAE latents that can be decoded into an image. The number of iterations is also a hyperparameter.
This process is depicted in the diagram below. If you want to understand this process better, I advise you to read High-Resolution Image Synthesis with Latent Diffusion Models paper. And go threw StableDiffusionImg2ImgPipeline implementation.
 paper**](/public/images/posts/2023-08-28-stable-diffusion-inpainting/architecture.png)
How To Make Inpainting Work
There are several approaches to incorporate Stable Diffusion (SD) for inpainting tasks. One such method is to fine-tune the original SD model. RunwayML has implemented this approach, making runwayml/stable-diffusion-inpainting checkpoint:
First 595k steps regular training, then 440k steps of inpainting training at resolution 512x512 on “laion-aesthetics v2 5+”. For inpainting, the UNet has 5 additional input channels (4 for the encoded masked-image and 1 for the mask itself) whose weights were zero-initialized after restoring the non-inpainting checkpoint.
But lots of finetunes were not trained on inpainting task at all. So how can we use them for this task?
At each iteration step, we can substitute the area that is not under the mask with the original image latents plus the amount of noise needed for this step. The area under the mask we will leave untouched. This way, we will make sure SD only changes the masked area. And at the same time, SD will know about the area that needs to stay the same.
Let’s see how we can update StableDiffusionImg2ImgPipeline, to work this way. At each step I will provide GitHub link to the needed line in diffusers-inpainting repository.
-
Add new parameter mask to the
__call__methodmask_image: Union[torch.FloatTensor, PIL.Image.Image] = None, -
Check, that
mask_imageis not Noneif mask_image is None: raise ValueError("`mask_image` input cannot be undefined.") -
Preprocess the mask
mask = prepare_mask(mask=mask_image) -
Resize input mask to the size of the latents, which VAE outputs
height, width = mask.shape[-2:] mask = torch.nn.functional.interpolate( mask, size=( height // self.vae_scale_factor, width // self.vae_scale_factor ) ) -
At the end of each diffusion step substitue area which is not under the mask, with original input latents plus noise needed for this step. Area under the mask leave untuched.
 # Adding noise to original latents
 init_latents_proper = self.scheduler.add_noise(
     init_latents, noise, t
 ).to(device)

 # Using mask
 mask = (mask > 0.5).to(prompt_embeds.dtype)
 latents_with_noise = (
     mask * latents_with_noise + (1 - mask) * init_latents_proper
 )
That’s it. With this setup, we will make SD generate something inside the masked area. The unmasked area will be left untouched because we substituted it with the original latents at each diffusion step. And because SD can change only the area under the mask, it will force itself to make it consistent with the whole image. At the same time, it will try to follow the prompt.
Examples
Below you can find the result of this algorithm, generated with the model redstonehero/Yiffymix_Diffusers, which doesn’t have any inpainting checkpoint.
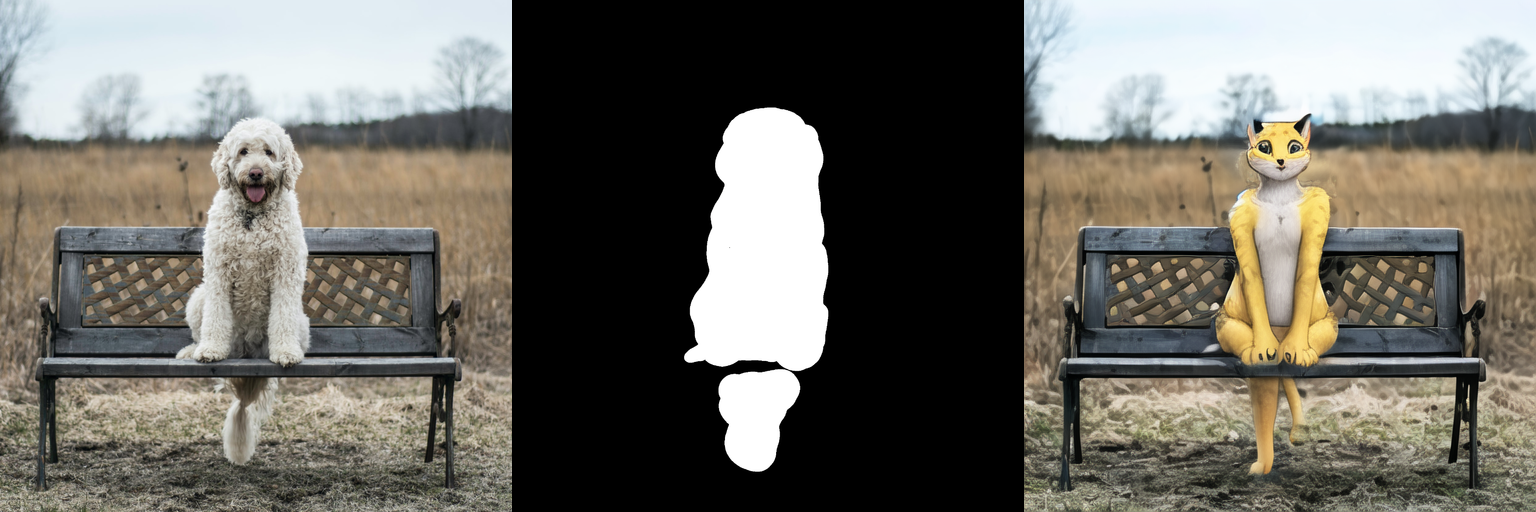
Gif below shows denoising process for this image
This algorithm works and can give decent results. However, it performs poorly when we want to simply remove the object from the masked area. Let’s compare the performance of runwayml/stable-diffusion-v1-5 using our pipeline with runwayml/stable-diffusion-inpainting using the StableDiffusionInpaintPipeline. It’s important to note that runwayml/stable-diffusion-inpainting was specifically trained for the inpainting task.
To remove an object from the image, let’s provide an empty prompt to the model. With an empty prompt, the model will attempt to make the masked area as consistent with the rest of the image as possible.
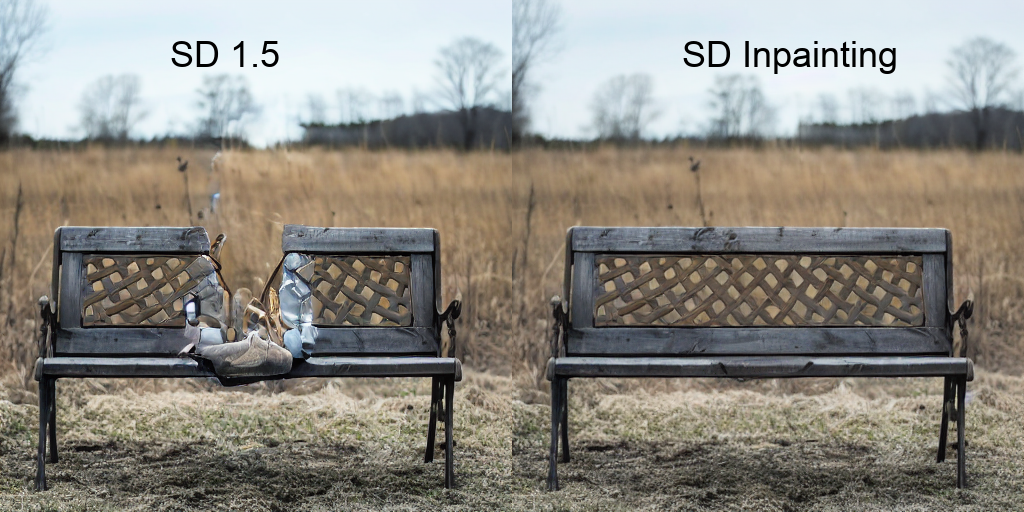
So, we can see that our algorithm failed, but SD inpainting performed quite well. Additionally, a model specifically fine-tuned on the inpainting task will be able to produce better and more consistent results for text-guided image inpainting.
Conclusion
The algorithm we have implemented today can be a good choice if there is no inpainting model available for fine-tuning. However, if there is an inpainting model specifically trained for the task, it is undoubtedly better to use it.
If this article was useful, don’t forget to clap and leave a star in the diffusers-inpainting repository. If you have any questions, feel free to reach out to me on LinkedIn. I will gladly help! 😁